This week: the forest floor of Endor
The Map Builder keeps proving it's good at one particular thing — turning famous Star Wars scenes into maps you can actually fight across. Last time it was the beach at Scarif. This week we head to the Sanctuary Moon and the fight that decides the whole Battle of Endor: the ground assault on the shield generator bunker.
It's a great tactical scene for the same reason it's a great sequence in the film — it isn't one fight. There's the open ground you have to cross, the bunker you have to fight through, and the reactor you have to break once you're inside.
Endor — The Shield Bunker Assault
The strike team has to reach an Imperial bunker hidden in the trees and destroy the generator projecting the Death Star's shield. The Empire knew they were coming. What tips the balance isn't the commandos — it's the locals who live in those trees.
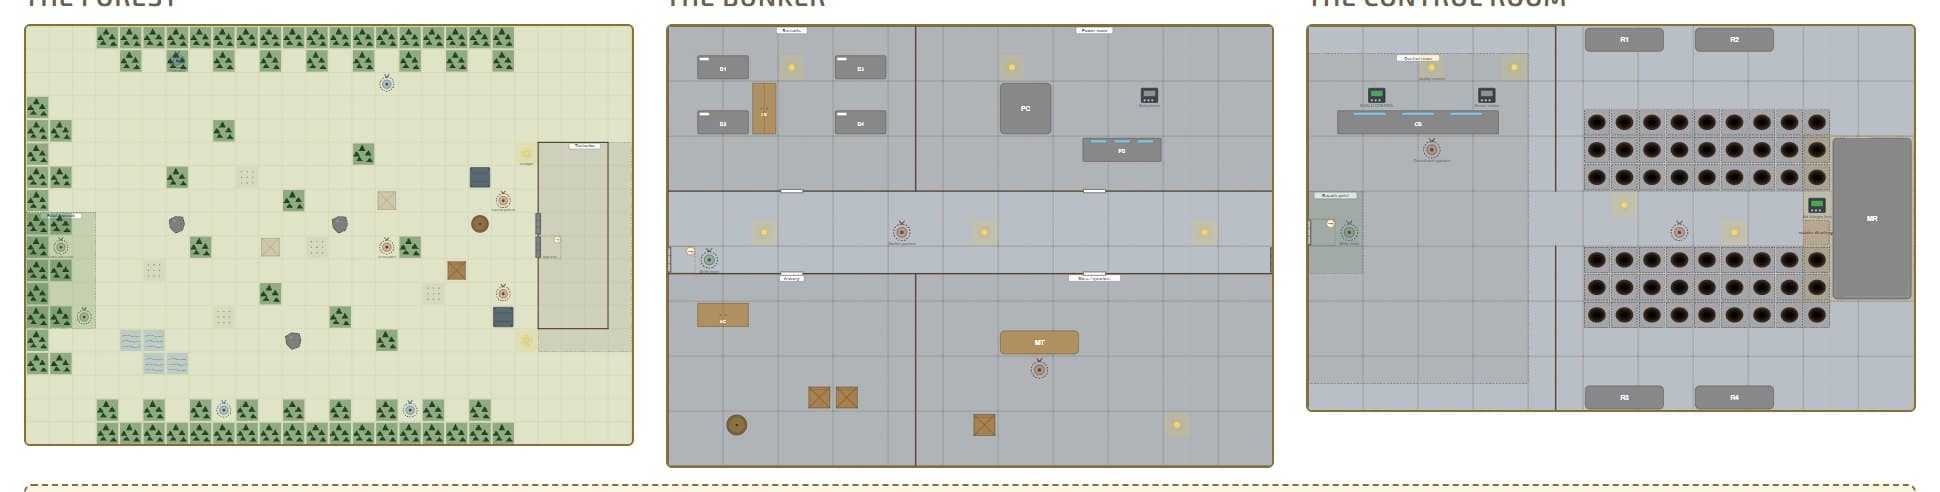
We built it as three connected acts — the forest, the bunker interior, then the control room and reactor:
Endor — The Shield Bunker Assault
- The Forest ↔ The Bunker — Blast door
- The Bunker ↔ The Control Room — Control-room door
- 1redwoods
- 2mossy boulder
- 3fallen log
- 4Imperial cargo
- 5floodlight
- 6Bunker blast door (10 ft)
- 7Rebel strike team
- 8Ewok allies
- 9Imperial garrison
- 10Scout patrol
- 11Breach point
- 12To control room
- 13munitions crate
- 14Subsystems
- 15Strike team
- 16Bunker garrison
- 17From corridor
- 18SHIELD CONTROL
- 19Sensor station
- 20display screens
- 21Strike team
- 22Control-room garrison
- 23Set charges here
- 24reactor discharge
How to run it
Act 1 — The Forest
The strike team enters from the west (the green markers) and has to cross the clearing to the bunker's blast door on the east side. The defenders hold the installation and a forward patrol sits out in the open ground (red markers). The cover between is what the forest gives you: redwoods (three-quarter cover), scattered boulders, fallen logs, and the Imperials' own supply cache. The ferns are difficult terrain and the creek in the south-west slows a crossing.
The twist is the Ewoks (blue markers in the tree lines). Don't start them in the fight — bring them in a round or two after the shooting starts, pouring out of the north and south treeline to hit the Imperial flanks. It changes the math instantly and it's the whole point of the scene: the commandos don't win this on their own. If your table wants the full film beat, drop an AT-ST in from the east treeline as a heavy and let the Ewoks try to bring it down with logs and rope — it's a set-piece your players will talk about.
Reaching the blast door isn't the end of Act 1 — they still have to breach it (a Use Computer or Mechanics check to slice it, or blow it with charges) to move inside.
Act 2 — The Bunker
Inside, it's a proper complex, not a single room. A central corridor runs the length of the bunker, with the trooper barracks and a power room off to the north and an armory and mess/quarters to the south, so the strike team has to push through the whole complex before they reach the control room. Run it as a fighting withdrawal: the garrison gives ground room to room, using bunks, munitions crates, and consoles for cover, falling back toward the sealed blast door to the control room at the east end. It's a change of pace from the forest — tight quarters, corners, and doors instead of open ground.
One design note: in the finished film you basically cut straight to the control room, but I built the corridors-and-garrison stretch first, before the control room, after watching the deleted scenes below. They show the strike team actually having to fight through corridors and rooms full of troopers before they get to the control-room door — which makes for a much stronger middle act than a single room.
Act 3 — The Control Room
Through the last door and onto the console platform that looks out over the reactor — straight out of the film. The SHIELD CONTROL console and the officer's station sit on the platform; beyond it, a single narrow catwalk crosses the open reactor shaft, running between the banks of glowing reactor units to the main reactor at the far end. The drop into the shaft is lethal, so the crossing is single-file under fire while the defenders hold the platform and the walkway. The objective is loud and simple — set the charges on the reactor (and slice the SHIELD CONTROL console if you want to hurry the shield's collapse). Run the defenders as reinforcements that keep arriving each round the charges aren't set, so the party feels the clock. Once the charges are placed, the shield falls and the fleet upstairs gets its shot.
The stat blocks
You don't need anything exotic — this is a scout trooper and stormtrooper fight, with the Ewoks as low-tier skirmishers who win through numbers, terrain, and traps rather than firepower. The bestiary has the Imperial line ready to drop in; scale the counts to your party (the map footnote has suggested numbers for a party of four or five around level 5–7). The AT-ST is your optional boss — treat it as a mobile hazard the Ewoks can disable, not just a bag of hit points.
Play it your way
Everything's free and ready to run:
- Open the full map — all three acts, the terrain key, and the GM notes.
- Download the printable PDF — tiled at LEGO scale (1 inch = 5 feet), print and tape it together.
- Load it into the Map Builder — want more redwoods, a bigger bunker, your own trap lines? Open it up and make it yours.
Next week, somewhere new. Got a location you want to fight across? Tell us.